

Dominik
/Backend Engineer
If you came here for the implementation details only, feel free to skip ahead. The source code is available on this GitHub repo.
Introduction
First, we need to clarify two terms: Authentication and Authorization.
Authentication is the act of validating that users are who they claim to be using passwords, authentication apps, or biometrics. This means that you provide some unique data to prove that you are who you claim to be, and the system that authenticates you determines whether the claim is valid or not.
Authorization, on the other hand, in system security, is the process of giving the user permission to access a specific resource or function. At this point, it is proven that you are the one who you claim to be but the server must determine whether you have the necessary roles to access a particular resource.
For a more in-depth look at this topic, see Okta’s 101 here.
As mentioned in Okta’s article, “In secure environments, authorization must always follow authentication. Users should first prove that their identity is genuine before an organisation’s administrators grant them access to the requested resources.”
In this article, I’ll try to give a basic idea of using an external authentication provider in your Spring API. We don’t want our API to authenticate users. In most cases, the Frontend does the authentication, gets a token, stores it in a cookie or local storage and appends it to the Authorization header every time our API is called. This means that our API only needs to validate the incoming token in the request header and, if the token is valid (and the user has the required permission for the resource) pass the response to the caller.
This is a pretty specific problem in this topic so I assume you have some basic understanding of what Spring, JWT, OAuth2 and Auth0 are as an authentication service. Personally, I’m not a fan of copy-paste introductions to the technology used in an article. So if you’re not familiar with the stack I mentioned, below are some links to get you started:
Loading
Loading
Loading
Loading
If you are still here and did not get lost in the resources above then it's neat!
Let’s dive in!
Create your auth0 account
The first step is to register an account on auth0.com and create your API on the dashboard. This article isn’t a step-by-step guide to using the auth0 dashboard, you can find other resources on this topic, such as this one:
Loading
In this guide, you will need the issuer and the audience of your registered API.
If you’re not familiar with auth0, take your time and read some articles about it, how to use the Dashboard etc. That will help you understand the basics. Or if you are more adventurous you can go ahead and learn it on the fly.
Add Springdoc Openapi UI
We need a way to test our API using the token provided by Auth0. You can do this either using Postman or CURL with custom headers like:
curl -H "Authorization: Bearer <ACCESS_TOKEN> See the example here.But I prefer to use Springdoc Openapi UI which is a useful tool to create documentation for your APIs so it could be useful to get familiar with.
You need to add the springdoc dependency to your pom.xml file
And create the required configuration:
With the @SecurityScheme annotation, you can use the “Authorize” button at UI so you can provide your JWT in the header, but we’ll discuss that later.
The group() and pathsToMatch() are mandatory builder functions. They allow you to create multiple OpenAPI definitions in one Spring Boot project. In this example, it’s sufficient to use only one group with the root path, but in your case, you can configure it as you need.
Create API endpoints
After you create your API in Auth0. You need to implement some endpoints to test if the authorization works correctly.
First, we create a public endpoint that’s not protected in any way.
Nothing fancy here, just a simple endpoint that processes a GET request and return a simple string. After that, we want an endpoint that only authenticated users can access, so let’s do that too:
At this point, you should be able to start your application and access Swagger UI with both endpoints available at http://localhost:8080/swagger-ui/index.html
You should see something like this:
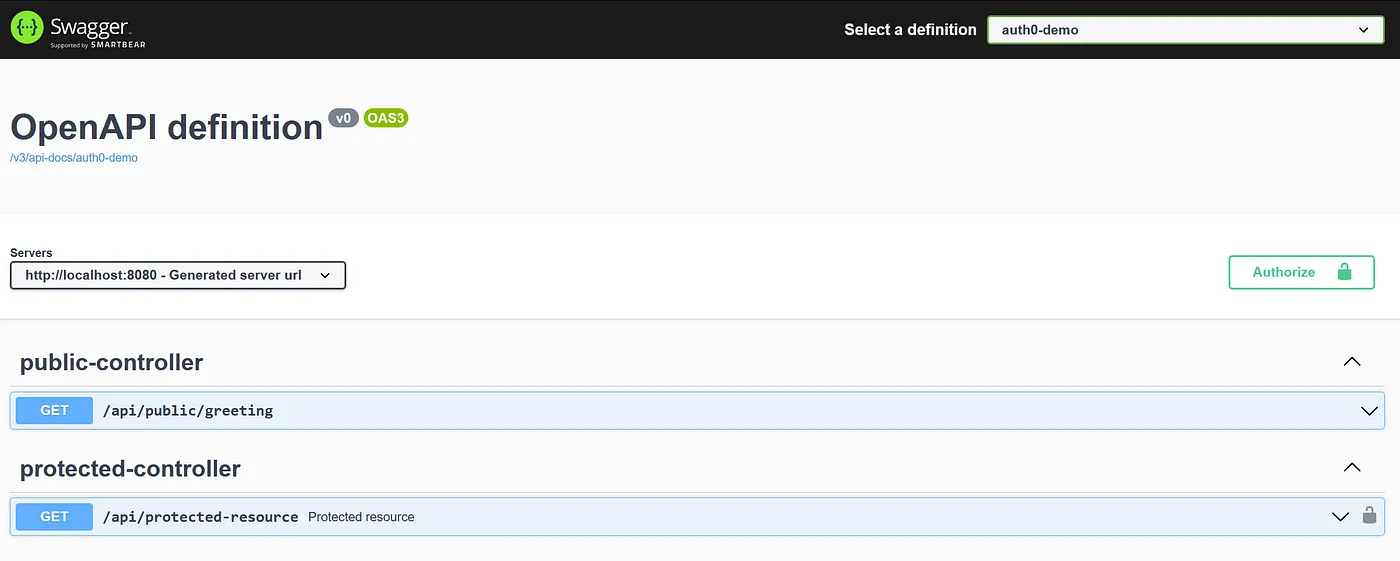
Swagger doc screenshot
That’s good progress, at this point, we’ve already created our API on the Auth0 authentication platform and we’ve got a working Java API with two endpoints with a great built-in interface to test and document our API endpoints.
Add security configuration
The next step is to add the security components to our application. We need to add a few dependencies to hook this up properly.
First, we need the spring-boot-starter-security module to configure our security options.
We need to add spring-boot-starter-oauth2-resource-server which contains Jwt, JwtDecoder, JwtValidator and other Oauth2 components we need to process and validate the incoming tokens.
The last two dependencies our application needs to work properly with Auth0 are java-jwt and jwks-rsa from the com.auth0 groupId. These are required to decode and validate the signature of the token we get from auth0.
Add these lines to your pom.xml file:
Perform a maven update and we are ready to go.
At this point, if you boot up your application your endpoints will require authentication. This behaviour is intentional because the spring-boot-starter-secuirty package provides basic authentication for the application once you add it to your project.
We’ve added the required dependencies, and now we are able to configure the security of our application.
Add these two lines to the application.properties file in your project, since we’ll need this config later. You can also use yaml file. In that case, use the appropriate syntax with the spaces.
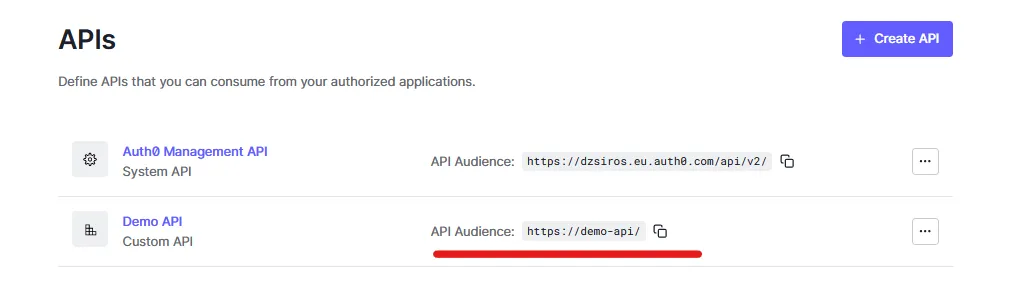
The audience is the identifier of your API. You can find it on the “APIs” tab in the Auth0 dashboard:
Add it to your config file after the
spring.security.oauth2.resourceserver.jwt.audience= key
You can find the issuer by clicking on your API on the “APIs” page, clicking the “Quick Start” tab and selecting Node.js:
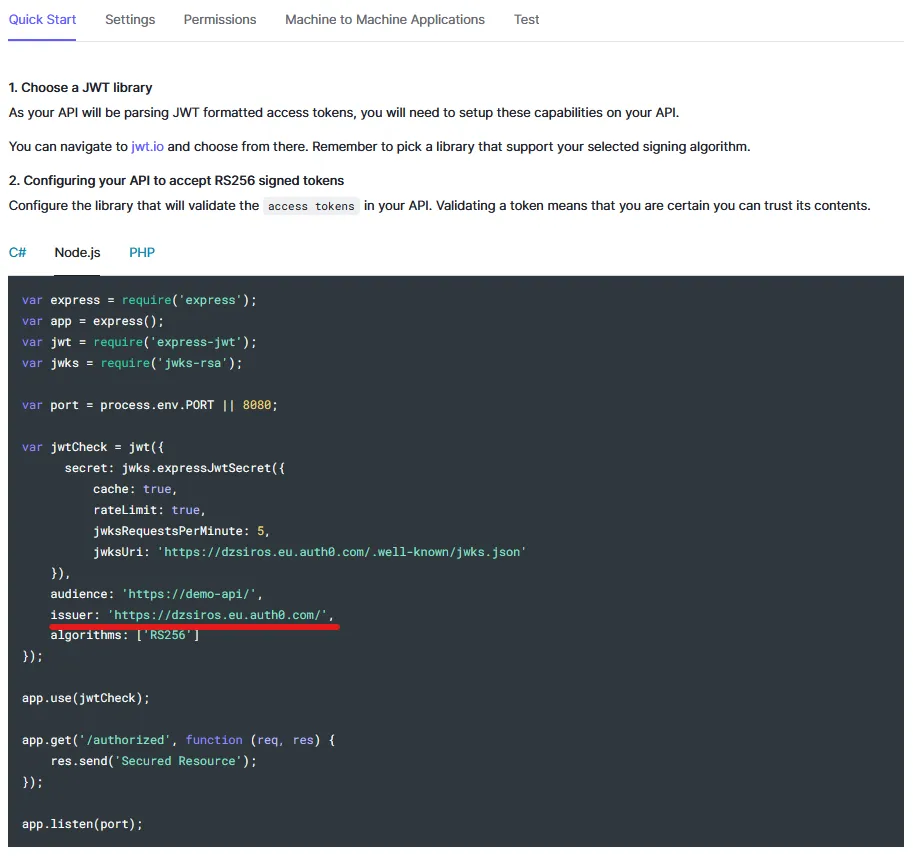
(Here you can find the audience of the API as well)
Add the issuer to your config file after the spring.security.oauth2.resourceserver.jwt.issuer-uri= key. The https:// prefix and the / at the end is important! So in my case, the config looks like this:
After this, create the SecuirtyConfiguration.java file and add these lines:
(At this point you will face some compile errors because some of the missing classes, we will fix that later, just let me explain this code first.)
We need to add the @Configuration annotation because in this class we define @Bean methods so that the Spring container is able to generate bean definitions and service requests for these beans at runtime.
You can also annotate the class with @EnableWebSecurity but that doesn’t really do much. The required configurations will be imported automatically even without this so the application will work properly, but your IDE may show a wrong error without it. More info here.
You also need two values that can be environment-dependent, so we’d better read them from a config file or an environment value. For this, you can use the @Value annotation as in the code above and we already have the values set.
Our first method is called filterChain and with it, we can get the HttpSecuirty object from the Spring container. With it, we can configure a lot of cool security-related stuff.
We want to define our public endpoints so using antMatcher we can say “Okay, we want to be able to access (permitAll) any endpoint that’s under the /api/public prefix (line 33). We also want to access all OpenAPI docs (line 34) publicly. Everything else should be protected with authentication (line 35).” Use .oauth2ResourceServer() (line 37) to auto-configure resource server behaviour with .jwt() to create JwtConfigurer that contains the JwtDecoder object we need to decode the JWT provided by the authentication server, in this case, provided by Auth0.
Note that this isn’t the best option in every case. You and your business needs should decide whether or not to provide public documentation for your API and whether or not to create public endpoints. It is a good rule of thumb to protect everything with authentication first, and only later open up the endpoints that are surely available for the public.
We also need to define and configure the mentioned JwtDecoder bean. We can go with NimbusJwtDecoder an implementation of the JwtDecoder interface included in the spring-security-oauth2-resource-server package. It has a factory method that takes the issuer as a parameter so we can use that.
The last thing we need to do is create the validators that can tell us if the token that comes with a request is a valid one.
First, we use the createDefaultWithIssuer factory method to create our default validator. If you check the implementation, this creates a JwtTimestampValidator and a JwtIssuerValidator. These check if the token hasn’t expired yet and if it was provided by our issuer. These two don’t provide too much security, so let’s go and add two more validators.
Create an AudienceValidator.java file and add this piece of code:
We need to implement the OAuth2TokenValidator interface so that we can add these validators to the validation chain. This will check if the audience is correct, that’s if the token belongs to our API and the sender wants to communicate with our application. If not, we return a failure result with an explanation. This still doesn’t provide too much security for our application, so create the SignatureValidator.java class and add these lines:
We need to decode the token value, we can do that with the Auth0 package. After that, we need the JwkProvider to give us a set of public keys provided by the issuer.
If you want to dig a little deeper under the hood, check out the UrlJwkProvider implementation you can see these lines:
static final String WELL_KNOWN_JWKS_PATH = "/.well-known/jwks.json";...final URI uri = new URI(domain + WELL_KNOWN_JWKS_PATH).normalize();In this case, the issuer is the same as our domain, so your issues are taken as the domain and the /.well-known/jwks.json is appended, so in my case, the URL will be: https://dzsiros.eu.auth0.com/.well-known/jwks.json
This is a public endpoint that should also work with your issuer and provide a slightly different set of values. As I mentioned earlier, JWK is a set of standardized keys with public keys as the values of the keys. In this case, it’s represented in a json format. With this set of public keys, we can ensure that if the token we received in a request was signed by the provider that holds those public keys. If you’re not familiar with the concept of public keys, you can read this wiki about it. In short, if a participant signs or encrypts some data with its private key (the private key shouldn’t be shared with anyone) and sends it to participant B, if B knows the public key that belongs to A’s private key, B can decrypt and read the data or verify that it was signed with the private key that is paired with the provided public key and verify if the data hasn’t been modified by a third party.
We don’t want to reach out to our auth0 JWK every time we get a request, so we wrap it in a GuavaCachedJwkProvider , which in its default configuration can cache up to 5 JWKs for a maximum of 10 minutes.
At this point we have our JWK provider, we can use the JWT’s keyId to retrieve the actual JWK object and use its public key and the RSA256 algorithm to verify the incoming JWT. If the token is invalid we can return a failed validation result and give a small explanation about the error. We can return success otherwise.
At this point, you’ve come pretty far with validating the incoming JWTs. For basic purposes, this can be enough but if you need more security you can extend the validators or write your own and add them to the jwtDecored’s JwtValidator delegate in the SecurityConfiguration file.
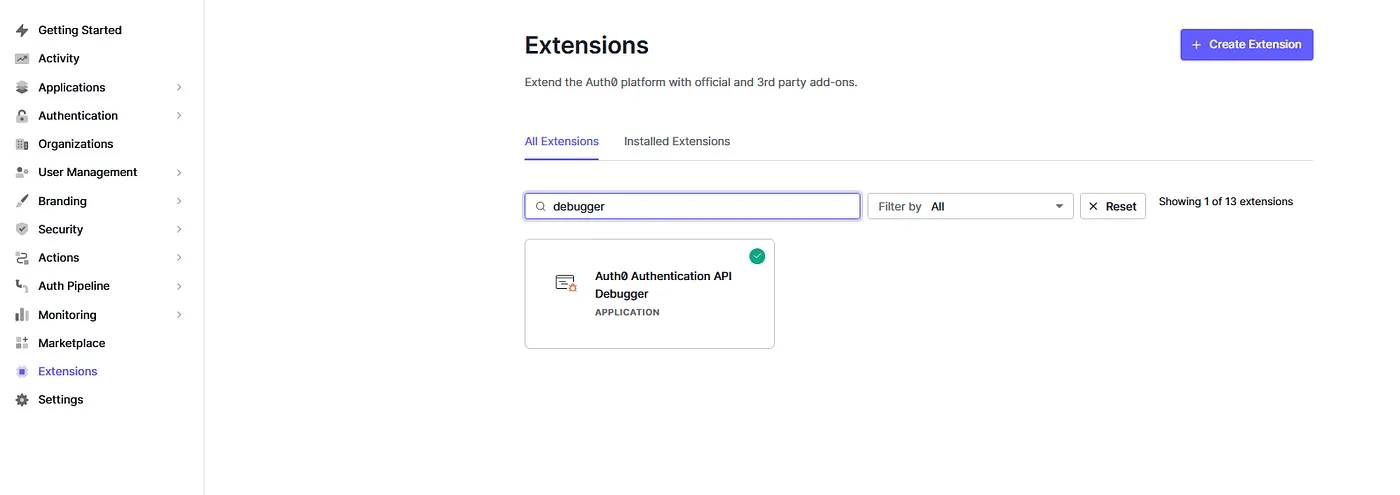
Use Auth0 Authentication API Debugger extension to obtain an access token
Everything should be set up at this point so the only thing we need is to test our endpoints. To do this, we need to get a valid token from Auth0. For this, you can use the Auth0 Authentication API Debugger Extension. Click on the extensions and search for the ‘debugger’ keyword
Click on it and install the extension. To use this properly with your registered API you need to config three things.
Find the Callback URL of the installed extension on the Debugger extension’s front page:
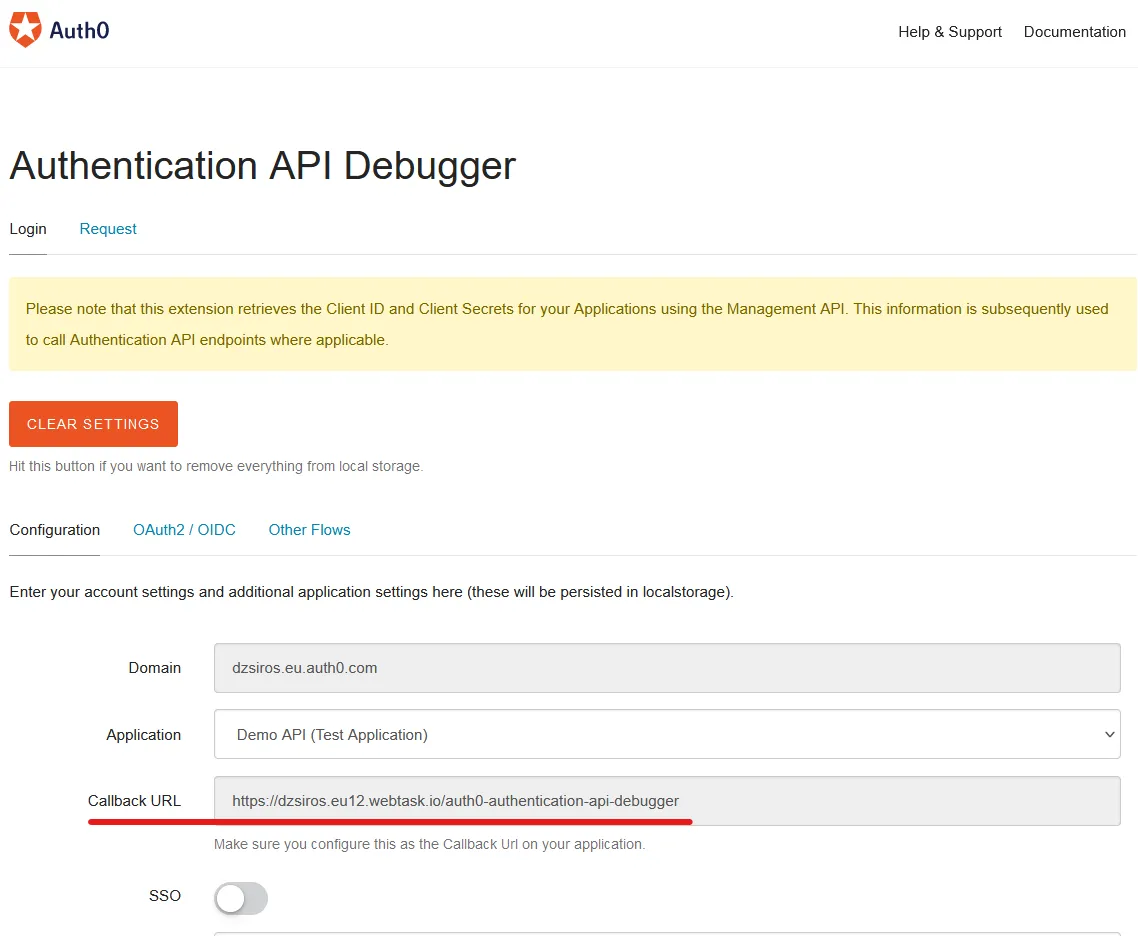
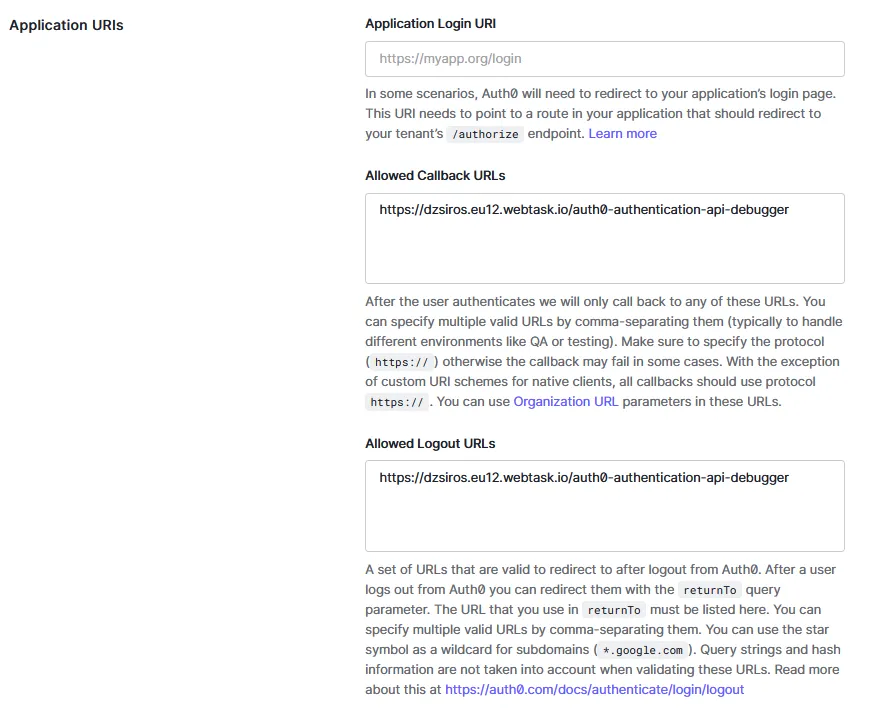
Add the Callback URL to the “Allowed Callback URLs” and the “Allowed Logout URLs” configuration on the “Applications” page for the created Test application that was made alongside the API.
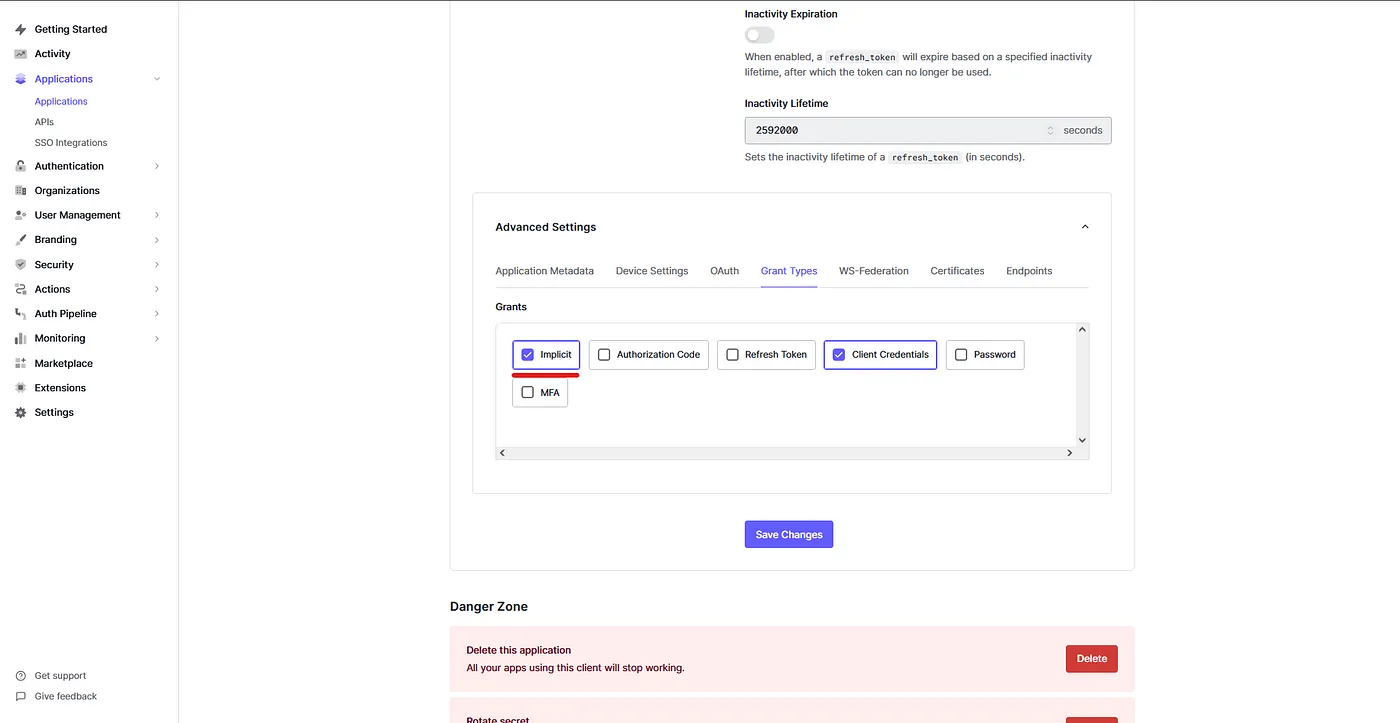
Next, scroll down on the same “Applications” page. Open the “Advanced Settings” at the bottom, click the “Grant Types” tab check the “Implicit” grant then save changes:
Now you're all set up. Open the Debugger Extension.
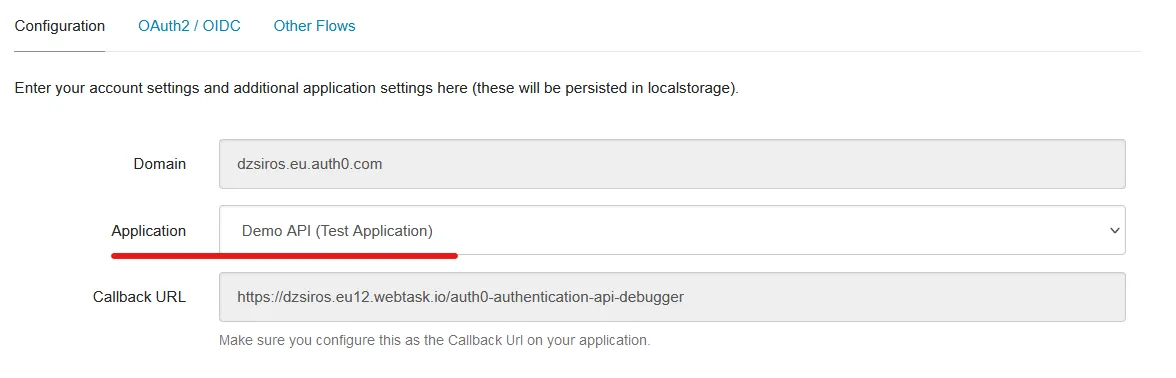
On the Configuration tab pick the Application that you’d like to log into. In my case, I just use the Test Application that was created alongside my Demo API:
Next, click the “Oauth2/OIDC” tab, scroll down and add the Audience of your API.
In my case, it looks like this:

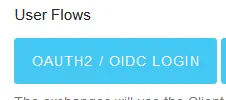
Now scroll up and click the “Oauth2 / OIDC Login” button
This should show you the Auth0 universal login page. Log in with your user. You should be able to use the same credentials that you use as your admin user.
Your access token will be available under the “Hash Fragment”
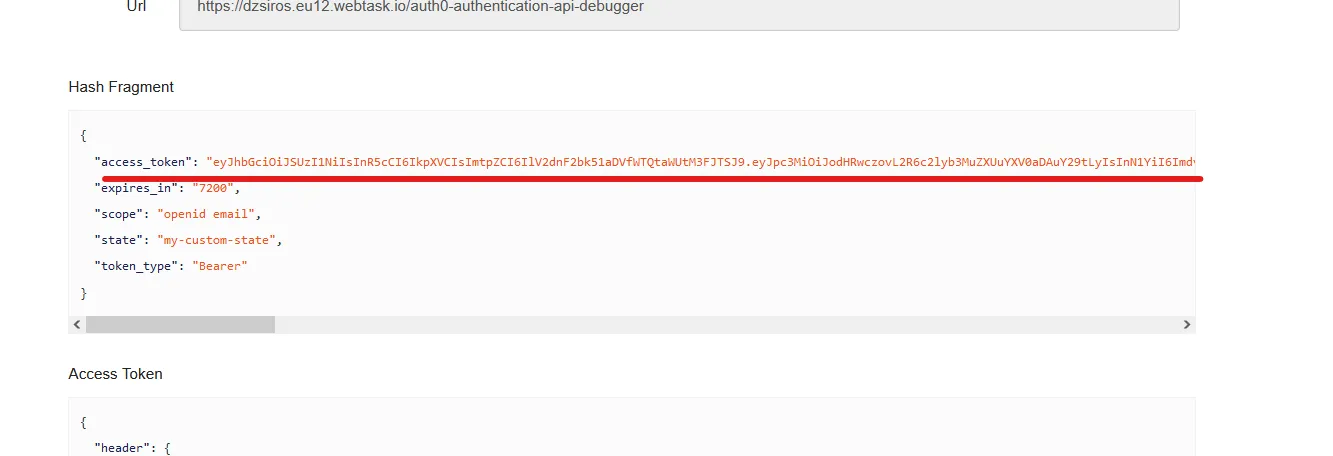
Copy your token without the quotation marks and run your Java application.
Go to the http://localhost:8080/swagger-ui/index.html URL and you should be able to see your two controllers with the public and protected endpoints.
First, let’s try it without using your access token. Open the public controller and click the “Try it out” button on the right corner. After that, hit the blue Execute button. This will fire up your request and it will show the result.
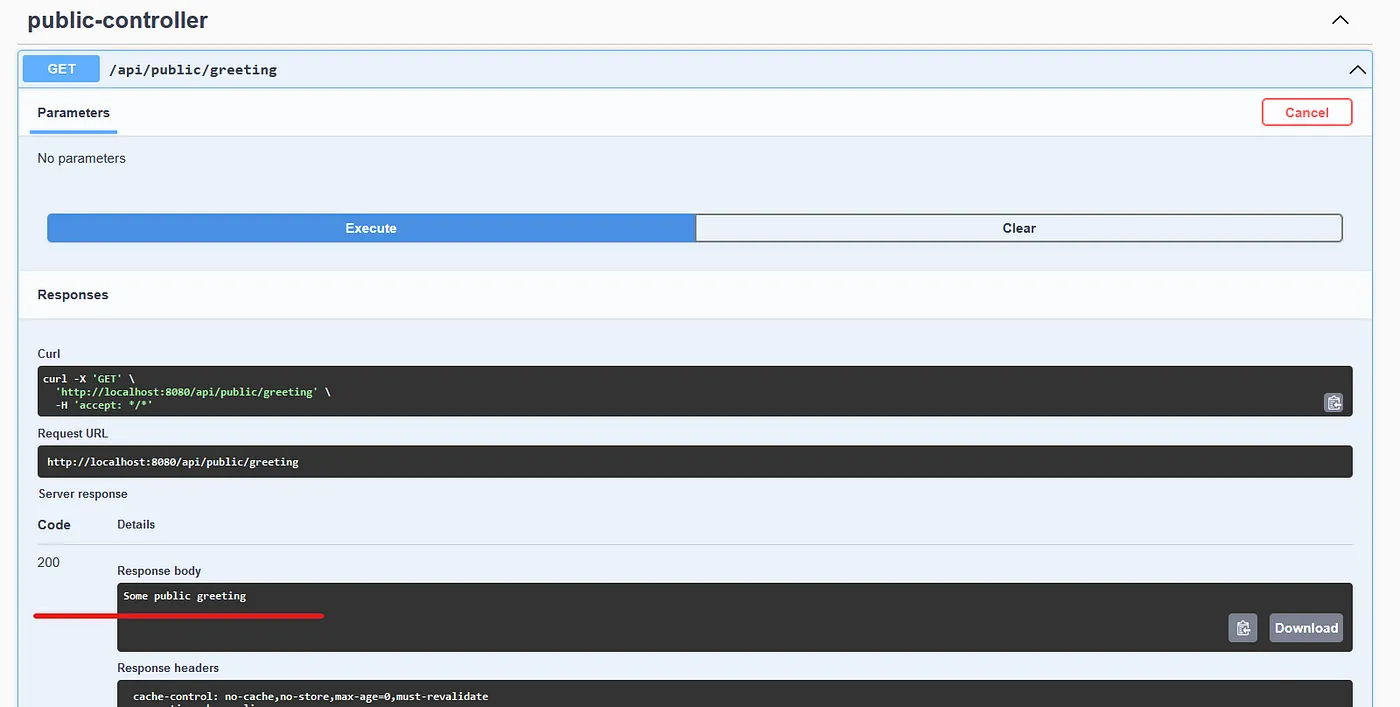
As you can see, I get the string with a HTTP 200 response, so our public endpoint is working as intended. Now check the protected resource as well.
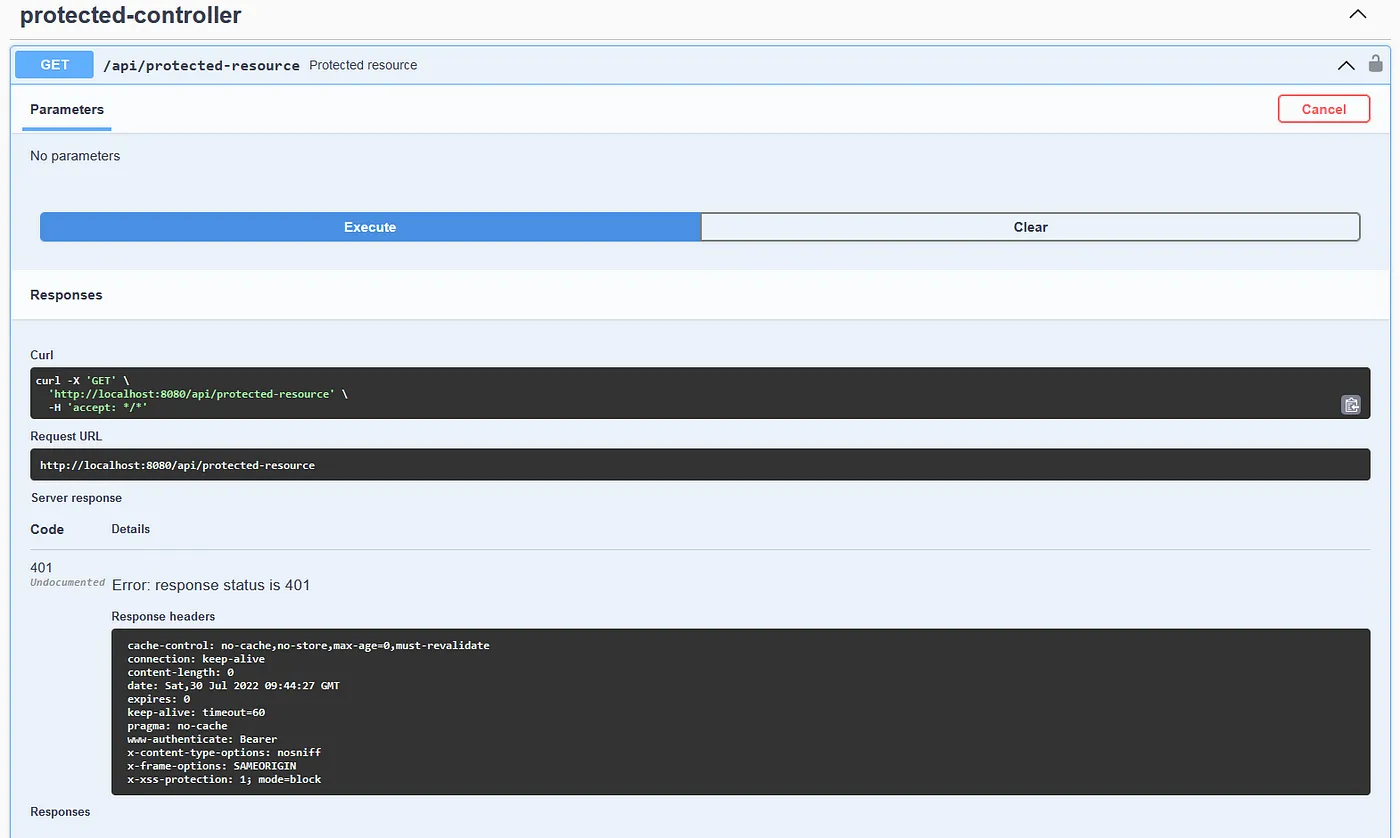
Without our token, we will get an HTTP 401, which means we are unauthorized. But don’t get alarmed, we already have a token from Auth0 so let’s use that.
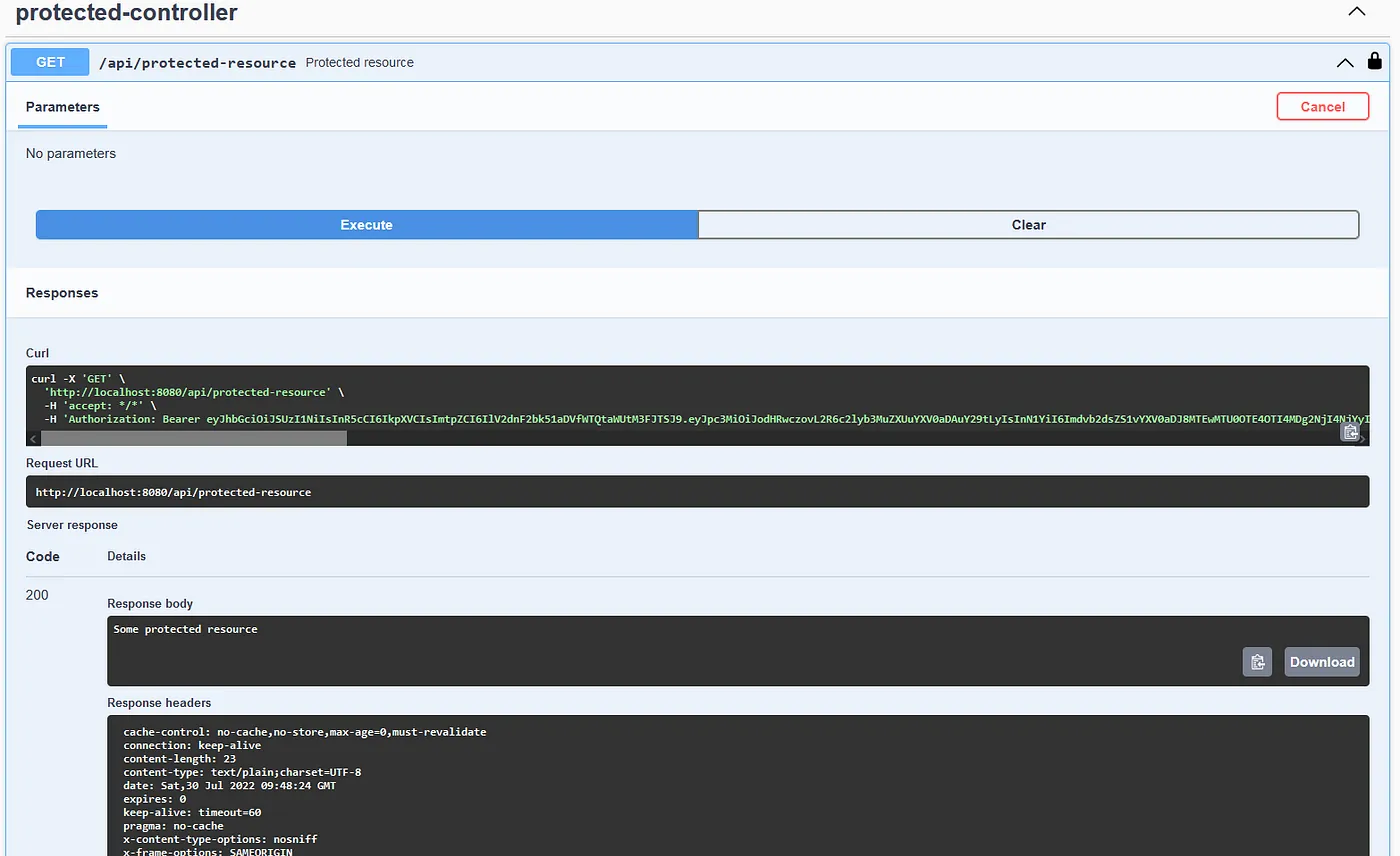
Scroll up on the page and hit the green Authorize button. Paste your token into the input field and hit the green Authorize button again. Then close the modal.
Try your endpoints again. On the public endpoint, you won’t really see any difference, but the protected endpoint should give you back your protected resource with an HTTP 200 response:
Final Thoughts
Good job, you made great progress in understanding the basics of the Oauth2 security workflow. You were able to peek into the concept of Authentication servers and resource servers. You have a basic understanding of how encryption and private/public keys work. You were able to understand the concept of JWTs and JWKs. You configured Spring Security, validated incoming tokens and were able to take that knowledge and implement it with your own API using a third-party authentication provider, Auth0.
These are great building blocks to start your journey into the world of API security and authentication providers. Keep up the good work, delve into these topics and find your own specific solutions to your specific problems.
I hope I could help with this little guide. Thanks for reading!

